
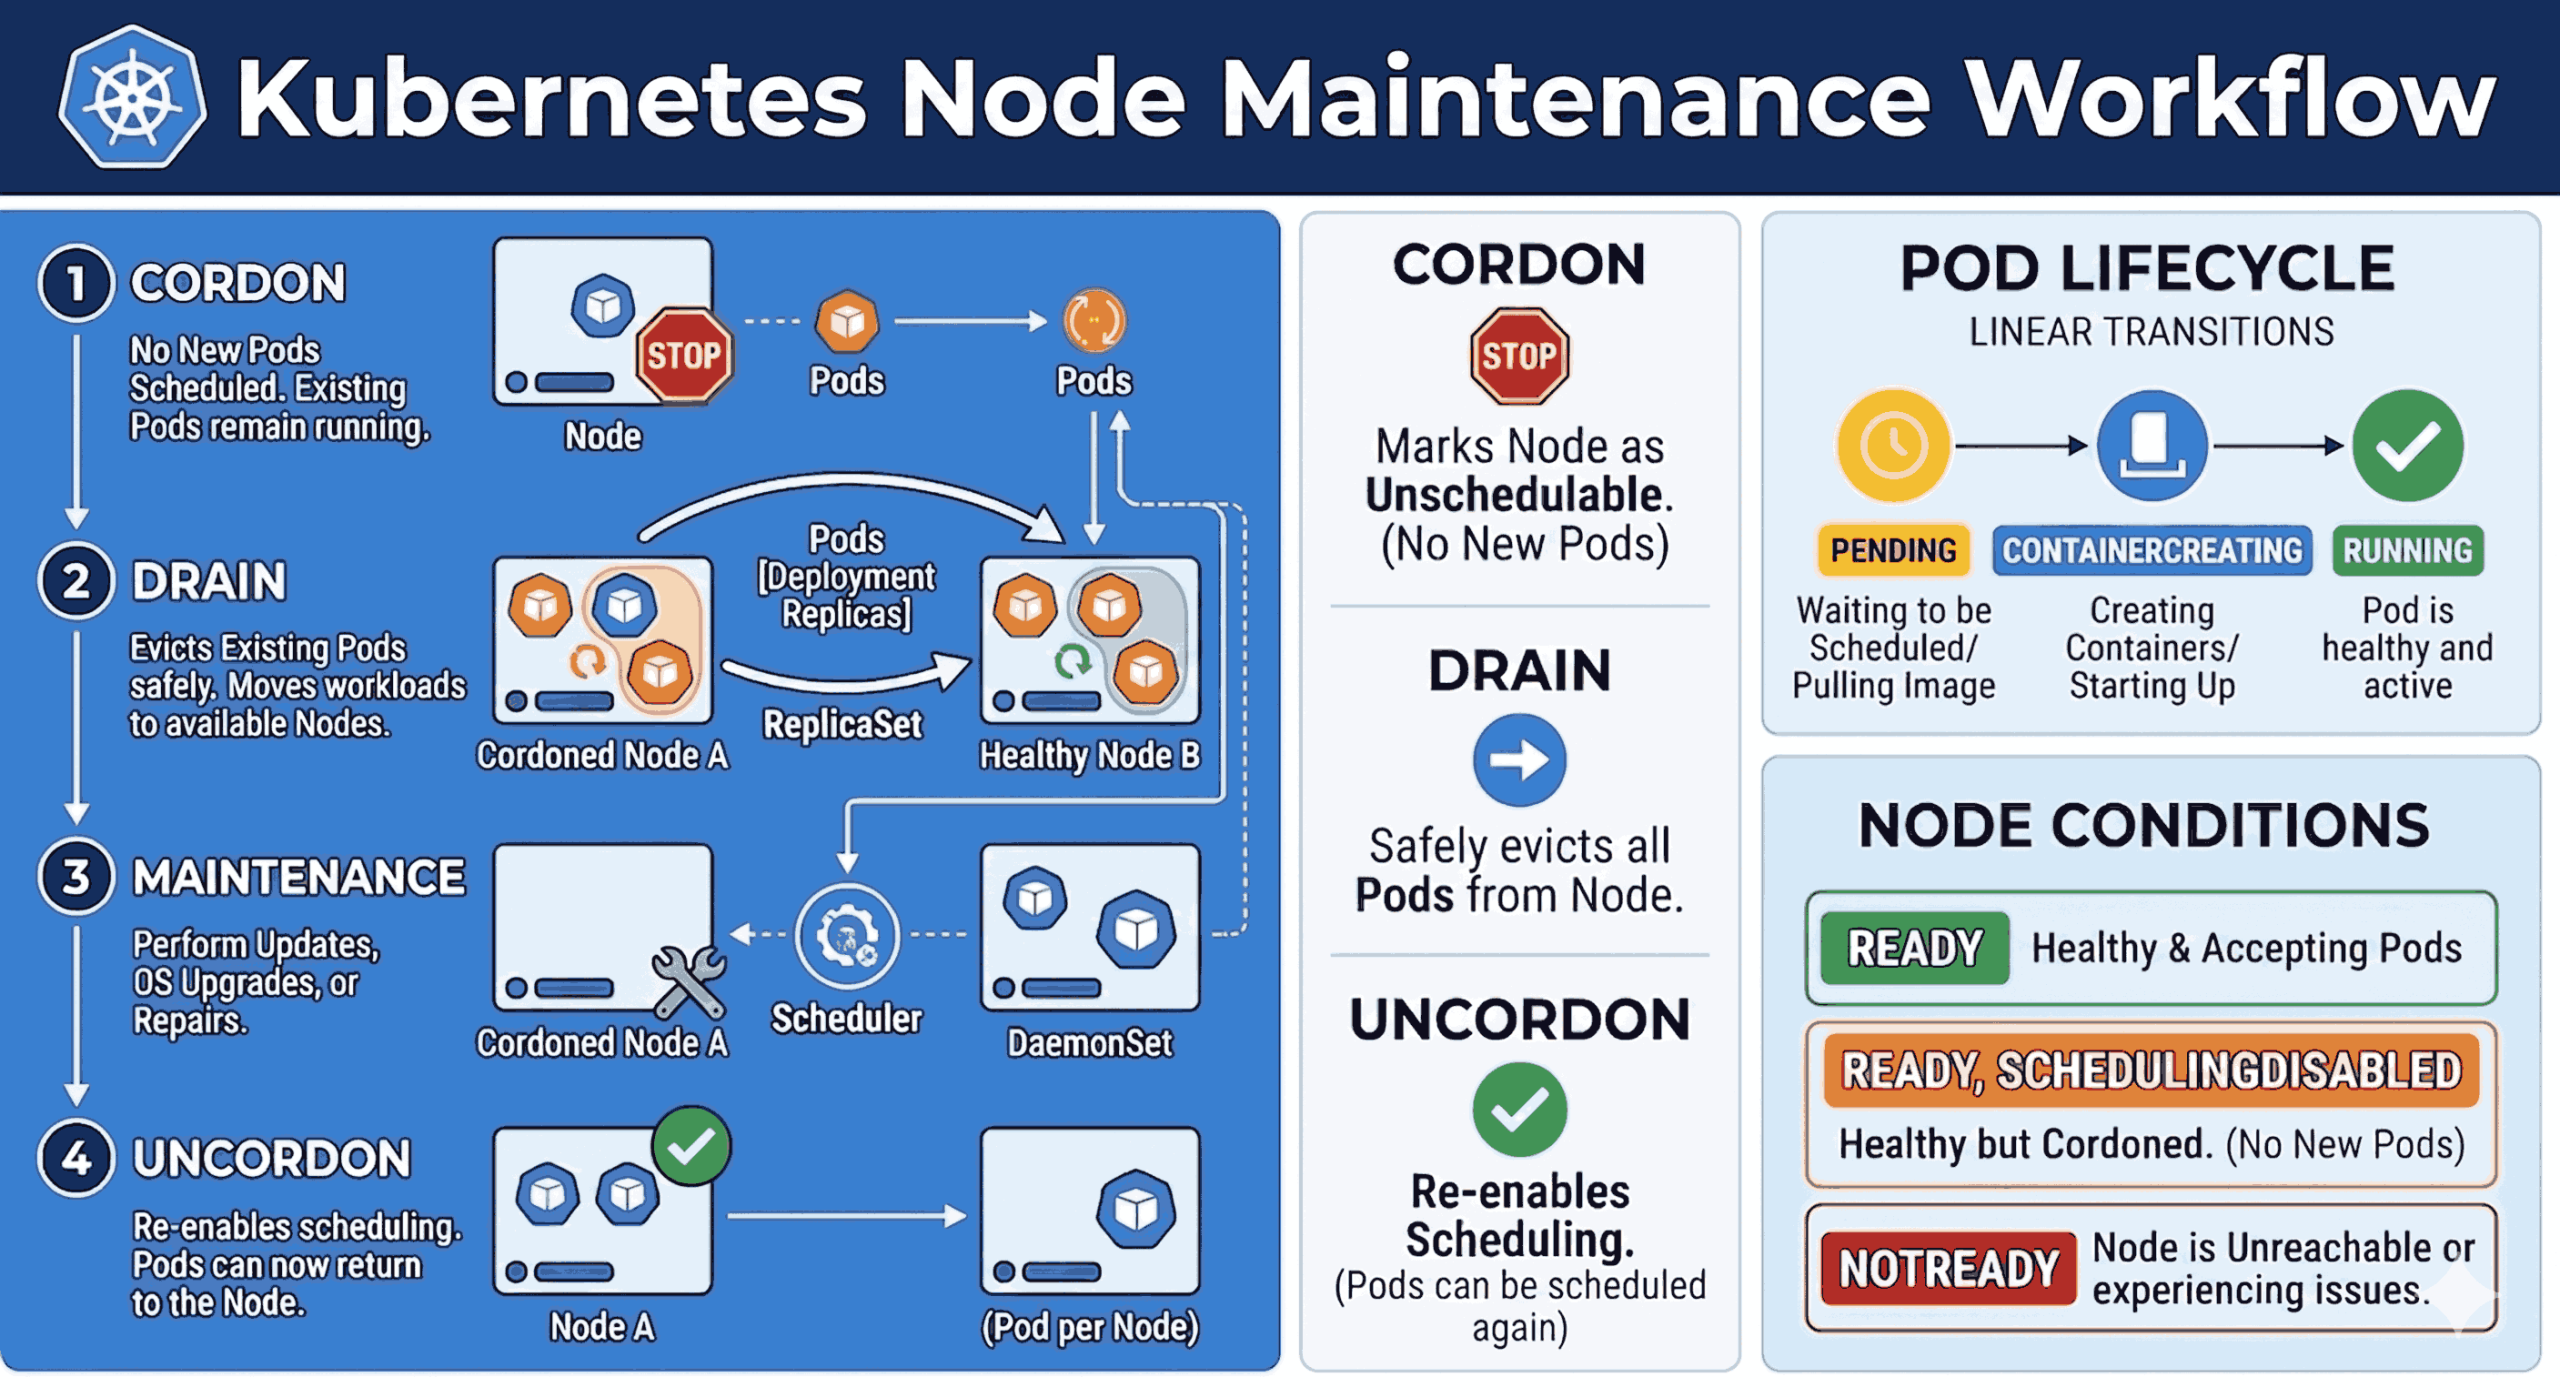
Kubernetes Node Maintenance: Achieving Zero-Downtime Upgrades
Kubernetes is famous for keeping applications online 24/7. But what happens when the actual physical computers running those apps (your servers or “nodes”) need security patches and software updates?.
If you simply shut down a server, you risk disconnecting users and crashing your app. To solve this, Kubernetes uses a built-in process called the Node Maintenance Workflow.
In this article, we will show you the exact steps to safely take a server offline, perform your necessary updates, and bring it back online – all without your users ever noticing a glitch.
ALSO READ:
- The Ultimate Guide to Kubernetes Architecture: A Step-by-Step Breakdown 2026
- Linux Server Health Checks Dashboard: Build a Powerful Monitoring Tool 2026
- AWS S3 Backups with This Efficient Shell Script
- Jenkins Spring Boot CI/CD Pipeline: 5 Easy Steps to Master Automation
Click here to go to the GitHub repos link
Core Kubernetes Concepts.
Before diving into the workflow, let’s quickly review the Kubernetes objects involved in this process:
- Node: A physical or virtual machine in your cluster where workloads execute.
- Pod: The smallest deployable unit in Kubernetes, representing a single instance of a running process.
- Deployment & ReplicaSet: Controllers that ensure a specified number of identical Pod replicas are running at all times. They provide the “self-healing” mechanism.
- Scheduler: The control plane component that decides which Node is best suited to run a newly created pod based on available resources.
- DaemonSet: A controller that ensures exactly one copy of a specific Pod runs on every single Node (often used for logging or monitoring agents).
The 4-Step Node Maintenance Workflow
Achieving zero-downtime maintenance relies on a strict four-step process: Cordon, Drain, Maintenance, and Uncordon.
Step 1: Cordon (Stop New Scheduling)
The first step is to tell the Kubernetes Scheduler to stop placing any new Pods on the target node. We do this by “cordoning” the node.
During this phase, existing Pods on the node continue to run normally without interruption. The node’s state officially changes from Ready to Ready,SchedulingDisabled.
kubectl cordon <node-name>Step 2: Drain (Evict Existing Workloads)
Once the node is cordoned, you need to empty it. The “drain” process gracefully evicts the running Pods.
Because your applications are managed by Deployments and ReplicaSets, Kubernetes recognizes that the evicted Pods have been terminated. The controller instantly spins up replacement Pods, and the Scheduler places them on other healthy, available nodes in the cluster.
Note: You will often need to use the –ignore-daemonsets flag, as DaemonSet Pods are tied to specific nodes and cannot be easily evicted.
kubectl drain <node-name> --ignore-daemonsets --delete-emptydir-data --forceStep 3: Maintenance (Perform Your Updates)
At this point, the node is completely devoid of regular application workloads. It is safely isolated from the cluster’s active traffic routing.
Now is the time for system administrators to perform their necessary tasks:
Apply security patches to the Linux OS.
Upgrade the underlying kernel.
Update container runtimes (like containerd).
Perform physical hardware repairs or RAM upgrades.
Step 4: Uncordon (Resume Scheduling)
Once your maintenance tasks are complete and the server is rebooted and healthy, it is time to bring it back into the fold.
By “uncordoning” the node, you remove the SchedulingDisabled flag. The node returns to a standard Ready state, and the Kubernetes Scheduler will immediately begin considering this node for any newly created or rescheduled Pods.
kubectl uncordon <node-name>What Happens Under the Hood?
Node States:
- Ready: The node is healthy and actively accepting workloads.
- Ready,SchedulingDisabled: The node is healthy, but the Scheduler is blocked from adding new Pods (the result of a cordon).
- NotReady: The node is unreachable or experiencing critical kubelet issues.
Pod Lifecycle During a Drain:
When a node is drained, replacement Pods go through a rapid lifecycle on the new destination nodes:
- Pending: The new Pod is waiting for the Scheduler to assign it to a healthy node.
- ContainerCreating: The node is downloading the container image and starting the application.
- Running: The container is fully active, and the Pod is ready to serve traffic.
Real Example
Before draining the Example cluster:
Node-1
 ├── nginx-pod-1
 └── nginx-pod-2

Node-2
 ├── nginx-pod-3
└── nginx-pod-4After draining Node-2:
Node-1
 ├── nginx-pod-1
 ├── nginx-pod-2
 ├── nginx-pod-3 (recreated)
 └── nginx-pod-4 (recreated)

Node-2
└── EmptyCommon Drain Issues:
Common Drain Challenges

• DaemonSet Pods
  Example: kube-proxy, flannel

• Standalone Pods
  Example: Pods created directly without a Deployment

• Local Storage Pods
  Example: Pods using EmptyDir volumes