
How to Efficient Linux Disk Management Techniques Using LVM
LVM (Logical Volume Manager) helps manage disk space better in Linux. Linux Disk Management It turns storage into easy-to-use virtual folders. You can resize storage without stopping anything. It also helps with backups and keeps data safe. Adding new disks and moving data is simple.
Linux Disk Management Techniques Using LVM Objectives:
- Install a new hardware disk drive
- Create a new partition
- Create a physical volume (PV)
- Create a volume group (VG)Create a logical volume (LV)
- Apply a file system
- Set a mount point
Linux Disk Management Techniques Using LVM Prerequisites:
- Basic knowledge of Linux commands
- Access to a Linux system with root or sudo privileges
- Familiarity with a terminal or command-line interface
NOTE:
Make sure to adjust the partition names (/dev/sda, /dev/sda1, etc.) based on your server setup and the file system you intend to use. This ensures everything works correctly and fits your needs.
Action Plan:
Install a New Hardware Disk Drive:
To see all available disks, use the command:
lsblk
Identify the new disk with the command:
fdisk -l

Create a New Partition:
Use fdisk to create a new partition:
fdisk /dev/sdh
Enter the following commands within fdisk:
n (create a new partition)
p (primary partition)
Specify partition number and sector values or press Enter to use default values.
w (write changes and exit)
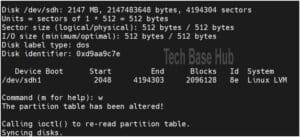
To check the new partition table:
fdisk -l
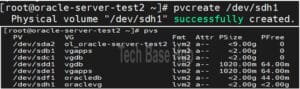
Create a Physical Volume (PV)
Create a physical volume:
pvcreate /dev/sdh1
To check the new physical volume:
pvs
or
pvdisplay
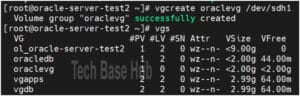
Create a Volume Group (VG)
Create a volume group:
vgcreate oraclevg /dev/sdh1
To check the new volume group:
vgs
or
vgdisplay
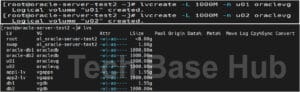
Create a Logical Volume (LV)
Create logical volumes:
lvcreate -L 1000M -n u01 oraclevg
lvcreate -L 1000M -n u02 oraclevg
To check the logical volume:
lvs
or
lvdisplay
Apply a File System
Apply a file system:
mkfs.ext4 /dev/oraclevg/u01
mkfs.ext4 /dev/oraclevg/u02
Set a Mount Point
Create directories for the mount points:
mkdir /u01
mkdir /u02
Mount the logical volumes:
mount /dev/oraclevg/u01 /u01
mount /dev/oraclevg/u02 /u02
To make the mount permanent:
Use the command:
cat /etc/mtab
Copy the new partition details.
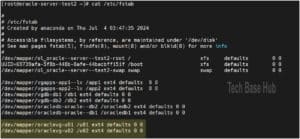
Open /etc/fstab:
nano /etc/fstab
Add an entry for the new partitions.
Verify the new mount points:
mount -av
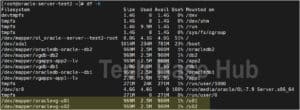
We have successfully created mount points ‘/u01‘ and ‘/u02‘.
Thank You